The finished result was a demolition of a detaching cabinet unit, into basic shelves. This is the final result, with an additional shelf unit to the left on the narrow wall.
This is what I started with. Making the best of a semi removed cabinet.
However the real work lay ahead as I needed to remove this whole unit as it was detaching from the ceiling - and I could just imagine one more earthquake loosening the remaining two ceiling screws!
First I detached the monster range hood cover. Then, with my handy reciprocating saw and cordless drill (I call it a screw gun), I was able to detach the remaining unit - albeit not in one piece however, so scraps were flying everywhere.
Success! How about that retro era wall paper? Maybe another time. This was behind the drywall.
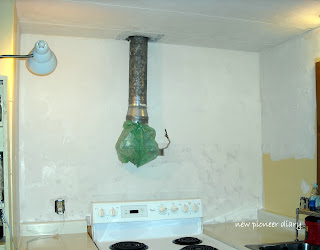
My most affordable option was to texture and paint this. All the while I am trying to decide if I will reattach the range hood, or get a vent-less one, or opt out all together.
Finding no solution for the monster exhaust pipe, I removed it (hole still in ceiling!), but I can easily address it with a patch of thin painted wood.
Here are the very simple shelves, hardware and boards are easily available at most hardware stores. The white boards have a smooth washable surface, perfect for a kitchen. With this kind of hardware I can easily add shelving later, or move them around when I get bored.
Note: the paint is really a lovely soft yellow, but terribly difficult to photograph.
Included here is the small narrow wall to the left. I removed the large bulky shelf from here, and painted the wall.
Now for the fun part! Placing items on the shelf. All you large family folks take note I live alone and have limited dishes, so it's a bit minimalist. I was delighted by the touch of color these few items added!
I decided to opt out of the range hood / exhaust fan all together as I'm not a fried food person anyway. But the electrical access is still available for the next tenant.
This shelf unit for the narrow wall was a complete kit in a box, perfect for this spot of only 24 inch width. I installed it high enough to be able to place things easily on the counter underneath, but low enough for me to reach the top shelf (I'm short).
Wooden cup holders are always useful in the kitchen. One was already here, and the other I picked up at a thrift store, painted them the accent color. Additionally I hung my digitally painted photograph titled "Girasole" on one wall, which really added color!
So there you have it! A DIY functional kitchen make over for under $200 in a 1972 single wide mobile home, that one woman can do on her own.


Job well done! Looks great!
ReplyDeleteYou are one creative lady..looks wonderful and I like that you took in to account a next tenant..positive words :)
ReplyDeleteThanks girls for stopping by! And thanks for the kudos!
ReplyDeleteIt looks good Jeni! Proud of your hard work!! A change like this is amazing!
ReplyDeleteYou are multi-talented! Way to go Jeni! It is beautiful!
ReplyDeleteThank you Ida and Gail!
ReplyDeleteThis looks fantastic, Jeni! Great job! I love how open and light it looks. :-) Jennifer
ReplyDeleteJeni....beautiful job...no telling what a woman can do when she puts her mind to it!!
ReplyDeleteThank you gals for your comments and kudos! :)
ReplyDelete