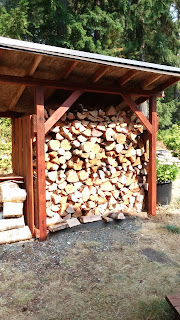
I get more hits on this post than any other, so I decided to update it. Please keep in mind this is the budget version of a shelter I needed for my fire wood. I too found it extremely difficult to find any help online, but did follow the advice of a skilled builder, well most of it anyway.
While it was very affordable this way, in retrospect I would have preferred to use treated 4x4's for the standing posts and cross posts.
I will be adding some more photos of the roof as that was my most challenging endeavor. There just aren't any good photos on the net. It's a basic build, plywood, roof paper, three tab roofing. The flashing is the most important! Fits right over the top of the shingles.
So here's the original post:
I must admit, this project was the most intimidating of all ideas, an actual "structure" I must build. But, never the less, I took it on. I needed a dry storage space for the fire wood closer to the house than the driveway for those two and three foot snows we sometimes get.
 |
| Fall of 2010 |
I began with a frame on level ground with concrete slabs under the posts. I extended the roof line on the left so that I could hang the garden tools there.
I also wanted a floor and sides to guard against snow drifts and snow melt. By the way, this is the "budget" wood shed, total cost was around $150.
I added these cute fence boards for looks, but it also allows for airflow.
Finished result is a stable structure with a roof and garden tool storage! Holds just a little over a half cord of wood.
Update 2011: This structure is in it's second winter and has held up nicely in spite of not having treated wood in the structure. I did stain some parts, and the cedar siding boards are treated fence boards.
Update 2012: This structure is getting ready for its third winter. As promised here is a photo of the roof which at the time was built on a very lean budget!! I had to use three kinds of roofing, but succeeded, and it has never leaked!
OK, now it's August of 2012, Compare how tall the tree is here to previous photos.
This shed has held up better than I thought. I was a little concerned about not using treated wood, but no probs! Also, to anyone who thinks they have to pour a foundation for a small structure like this - here is proof that is NOT necessary!
Here is the shed today (sorry about the washed out look, the sun is shining!). The roof and structure are still very sound. No leaks, no leaning, no rot.
So there you have it, it's August of 2012 and approaching it's third winter. Who says you can't build a woodshed on a budget??
Update 2017! Still sound, still standing. The apple tree came down due to bear mania, but the shed remains.
Update summer of 2021: Still standing, still functional, no leaks.
Update September 2023:
It needed a new coat of stain, I went darker this year. I also rehab-ed the floors and inside walls by taking out the plywood panels and just flipping them. I also put both side panels on one side - the side with snow drifts. I built in a temporary kindling rack too.
I did finally need a new roof and put that on last summer.


Wow! I can't believe you did this yourself! Amazing!
ReplyDeleteThanks PPC! A level, compact miter saw and a little courage goes a long way!
ReplyDelete